
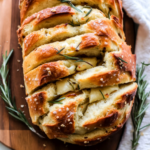
If you’re looking for a delightful addition to your dinner table, let me introduce you to my favorite Rosemary Garlic Pull Apart Bread! This bread is not only delicious but also incredibly fun to make. The warm aroma of rosemary and garlic fills your kitchen, making it the perfect comfort food for family gatherings or a cozy night in. Plus, it’s a crowd-pleaser that pairs wonderfully with soups, salads, or just on its own!
What makes this recipe even more special is its versatility. Whether you’re enjoying it on a busy weeknight or serving it at a festive occasion, this pull apart bread brings everyone together around the table. Trust me; once you try it, you’ll want to make it again and again!
Why You’ll Love This Recipe
- Easy to Make: This bread uses simple techniques that are perfect for beginner bakers. You’ll feel like a pro in no time!
- Family-Friendly: Kids love pulling apart the pieces and dipping them in their favorite sauces. It’s a fun way to get everyone involved in mealtime!
- Make Ahead Convenience: You can prepare the dough in advance and bake it when you’re ready, making meal prep a breeze.
- Delicious Flavor: The combination of rosemary and garlic creates an irresistible savory taste that will have everyone asking for seconds.
- Customizable Filling: Use your favorite cheese or add extra herbs to personalize each loaf to your family’s liking.
Ingredients You’ll Need
To create this mouthwatering Rosemary Garlic Pull Apart Bread, you’ll need some simple and wholesome ingredients that are likely already in your kitchen. Here’s everything you’ll need:
- 2 teaspoons Platinum Yeast from Red Star
- 1 Tablespoon granulated sugar
- 3/4 cup (180ml) whole milk
- 3 Tablespoons (43g) unsalted butter, softened to room temperature
- 1 large egg
- 2 and 1/3 cups (291g) all-purpose flour (spooned & leveled), plus more as needed
- 1 teaspoon salt
- 1 teaspoon garlic powder
- 1 Tablespoon finely chopped fresh rosemary (or 2 teaspoons dried)
- 5 Tablespoons (71g) unsalted butter, extra soft
- 1 Tablespoon finely chopped fresh rosemary (or 2 teaspoons dried)
- 1 Tablespoon finely chopped fresh parsley (or 2 teaspoons dried)
- 2 garlic cloves, minced or 1/2 teaspoon garlic powder
- 1/4 teaspoon salt
- 3/4 cup (95g) shredded parmesan, mozzarella, or white cheddar cheese (or your favorite shredded cheese)
- 1 Tablespoon (14g) unsalted butter, melted
- Coarse or flaky sea salt for sprinkling

Variations
One of the best things about this Rosemary Garlic Pull Apart Bread is how flexible the recipe is! You can tweak it based on what you have at home or what flavors you’re craving. Here are some fun variations:
- Add Some Spice: Mix in red pepper flakes for a little kick if you enjoy spicy flavors!
- Herb Infusion: Experiment with other herbs like thyme or oregano alongside rosemary for a unique twist.
- Cheesy Delight: Try mixing different cheeses like feta or goat cheese into the filling for added creaminess.
- Sweet Twist: For a brunch option, substitute the savory filling with cinnamon sugar and serve with honey!
How to Make Rosemary Garlic Pull Apart Bread
Step 1: Activate the Yeast
Start by placing the yeast and sugar in the bowl of a stand mixer fitted with a dough hook or paddle attachment. If you don’t have one, no worries! A regular large mixing bowl works just fine too. Heat the milk until warm to touch—about 110°F (43°C)—and pour it over the yeast mixture. Whisk gently and cover it loosely with a clean kitchen towel. Let it sit for about 5-10 minutes until frothy; this step ensures that your yeast is active and ready to help your bread rise beautifully.
Step 2: Combine Ingredients
Next, add softened butter, egg, flour, salt, garlic powder, and fresh rosemary into the bowl. Beat on low speed until everything comes together—this should take about three minutes. If your dough isn’t pulling away from the sides of the bowl yet, sprinkle in more flour gradually until it does. Remember, we want soft dough that feels just right!
Step 3: Knead the Dough
Keep mixing! If using a stand mixer, switch to the dough hook now; otherwise, knead by hand on a lightly floured surface for five minutes. The goal here is to develop gluten so your bread has structure but remains soft. If at any point the dough feels too sticky, sprinkle in flour one tablespoon at a time until it’s slightly tacky but not dry.
Step 4: Let It Rise
Shape your kneaded dough into a ball and place it in a greased bowl—nonstick spray works wonders! Cover it up tightly with plastic wrap or foil and let it rise in a warm spot until doubled in size. This takes about an hour but can vary based on room temperature.
Step 5: Prepare Your Filling
While your dough rises, mix together soft butter, remaining rosemary, parsley, garlic, and salt in another bowl. This flavorful filling will make every bite heavenly! Just ensure it’s at room temperature so it’s easy to spread later.
Step 6: Shape Your Rolls
Once risen, punch down the dough gently to release excess air and place it on a lightly floured surface. Divide into twelve equal pieces—think golf ball size—then flatten each piece into circles about four inches wide. Spread some of that delicious filling on each circle before adding cheese! Fold them over and arrange them upright in your greased loaf pan.
Step 7: Final Rise & Bake
Cover again with plastic wrap while preheating your oven to bake at around 350°F (175°C). Allow those rolls to rise again until puffy—around another half hour should do! Once ready, bake for about fifty minutes until golden brown on top. Don’t forget to brush melted butter over them before sprinkling sea salt just before serving!
And there you have it—the perfect Rosemary Garlic Pull Apart Bread that will impress anyone lucky enough to share it with you! Enjoy every fluffy bite!
Pro Tips for Making Rosemary Garlic Pull Apart Bread
Baking bread at home can be a delightful experience, and with these handy tips, you’ll be on your way to creating the perfect pull apart bread!
- Use fresh ingredients: Fresh yeast and spices enhance the flavor of your bread, ensuring a delicious result. Stale ingredients may lead to a less-than-satisfactory rise and taste.
- Knead until just right: Proper kneading develops gluten, giving the bread its structure. Ensure you follow the windowpane test so your dough has the right texture for that fluffy pull apart experience.
- Warm rising environment: Yeast loves warmth! If your kitchen is cool, consider placing your dough in a warm oven or near a heating source. This helps the yeast activate effectively, leading to a better rise.
- Let it rest: After shaping your dough, allow it to rest before baking. This short resting period helps relax the gluten, resulting in a more tender crumb.
- Experiment with fillings: While this recipe features rosemary and garlic, feel free to get creative! Add other herbs or cheeses that you love for unique flavor combinations.
How to Serve Rosemary Garlic Pull Apart Bread
Presenting this Rosemary Garlic Pull Apart Bread is as fun as making it! Its beautiful layers create an inviting centerpiece for any meal or gathering.
Garnishes
- Fresh herbs: Sprinkling chopped parsley or additional rosemary on top after baking adds a pop of color and fresh flavor.
- Olive oil drizzle: A light drizzle of high-quality olive oil enhances the richness of the bread and complements the garlic beautifully.
Side Dishes
- Mixed Green Salad: A simple salad with mixed greens, cherry tomatoes, and a light vinaigrette provides freshness that balances the richness of the bread.
- Vegetable Soup: A hearty vegetable soup pairs wonderfully with this pull apart bread for a comforting meal. Its warmth complements the flavors in every bite.
- Roasted Vegetables: Seasonal roasted vegetables bring caramelized sweetness that beautifully contrasts with the savory aspects of the bread.
- Garlic Herb Dip: Create a dip using olive oil, balsamic vinegar, and herbs for an added zing when tearing off pieces of this delightful bread.
Enjoy sharing your Rosemary Garlic Pull Apart Bread with friends and family—it’s sure to be a hit! Happy baking!

Make Ahead and Storage
This Rosemary Garlic Pull Apart Bread is perfect for meal prep, allowing you to enjoy delicious homemade bread any day of the week. You can easily store leftovers or even prepare it in advance for special occasions!
Storing Leftovers
- Allow the bread to cool completely before storing.
- Wrap it tightly in plastic wrap or aluminum foil.
- Store at room temperature for up to 2 days, or refrigerate for up to a week.
Freezing
- Slice the bread before freezing for convenience.
- Wrap each slice in plastic wrap, then place in a resealable freezer bag.
- Freeze for up to 3 months. Make sure to label the bag with the date!
Reheating
- For a quick reheating, pop slices in a toaster until warm and crispy.
- To reheat the whole loaf, wrap it in foil and place it in a preheated oven at 350°F (175°C) for about 15-20 minutes until heated through.
FAQs
If you have questions about this delightful recipe, you’re not alone! Here are some common queries:
Can I use different herbs in my Rosemary Garlic Pull Apart Bread?
Absolutely! Feel free to experiment with your favorite herbs such as thyme, oregano, or basil. Each will give your bread a unique flavor.
How long does Rosemary Garlic Pull Apart Bread last?
When stored properly, this bread can last up to 2 days at room temperature or about a week in the refrigerator. For longer storage, freeze it as mentioned above.
What cheese can I use for Rosemary Garlic Pull Apart Bread?
You can use any shredded cheese you love! Parmesan, mozzarella, or white cheddar all work wonderfully. Just make sure it’s shredded for easy melting.
Can I make Rosemary Garlic Pull Apart Bread ahead of time?
Yes! You can prepare the dough and filling ahead of time. Simply store them separately in the fridge until you’re ready to shape and bake.
Final Thoughts
I hope you find joy in making this Rosemary Garlic Pull Apart Bread! It’s not just a recipe; it’s an experience filled with warmth and comfort. Whether you’re sharing it with family or enjoying it solo, this bread is sure to bring smiles all around. Happy baking, and don’t hesitate to get creative with your flavors!
Rosemary Garlic Pull Apart Bread
Indulge in the warm, savory goodness of Rosemary Garlic Pull Apart Bread, a delightful addition to any family meal or gathering. This fluffy, herb-infused bread is infused with aromatic rosemary and zesty garlic, creating a comforting flavor that’s perfect for sharing. Easy to make and customizable, it invites everyone to tear off pieces and dip them in their favorite sauces or enjoy them plain. Whether served alongside soups, salads, or on its own, this pull apart bread is sure to become a cherished staple on your dinner table.
- Prep Time: 30 minutes
- Cook Time: 50 minutes
- Total Time: 1 hour 20 minutes
- Yield: Approximately 12 servings 1x
- Category: Bread
- Method: Baking
- Cuisine: American
Ingredients
- 2 teaspoons Platinum Yeast
- 1 tablespoon granulated sugar
- 3/4 cup whole milk
- 3 tablespoons unsalted butter, softened
- 1 large egg
- 2 and 1/3 cups all-purpose flour
- 1 teaspoon salt
- 1 teaspoon garlic powder
- 2 tablespoons finely chopped fresh rosemary
- 3/4 cup shredded cheese (Parmesan, mozzarella, or white cheddar)
Instructions
- Activate the yeast by mixing it with sugar and warm milk. Let it sit until frothy.
- In a bowl, combine softened butter, egg, flour, salt, garlic powder, and rosemary with the yeast mixture until dough forms.
- Knead the dough until smooth and elastic; let rise until doubled.
- Prepare the filling by mixing softened butter with remaining herbs and garlic.
- Shape the dough into pieces, fill with herb mixture and cheese, then arrange in a greased loaf pan.
- Allow to rise again before baking at 350°F for about 50 minutes until golden brown.
Nutrition
- Serving Size: 1 serving
- Calories: 150
- Sugar: 0g
- Sodium: 180mg
- Fat: 7g
- Saturated Fat: 4g
- Unsaturated Fat: 2g
- Trans Fat: 0g
- Carbohydrates: 18g
- Fiber: 1g
- Protein: 4g
- Cholesterol: 20mg

Leave a Comment