
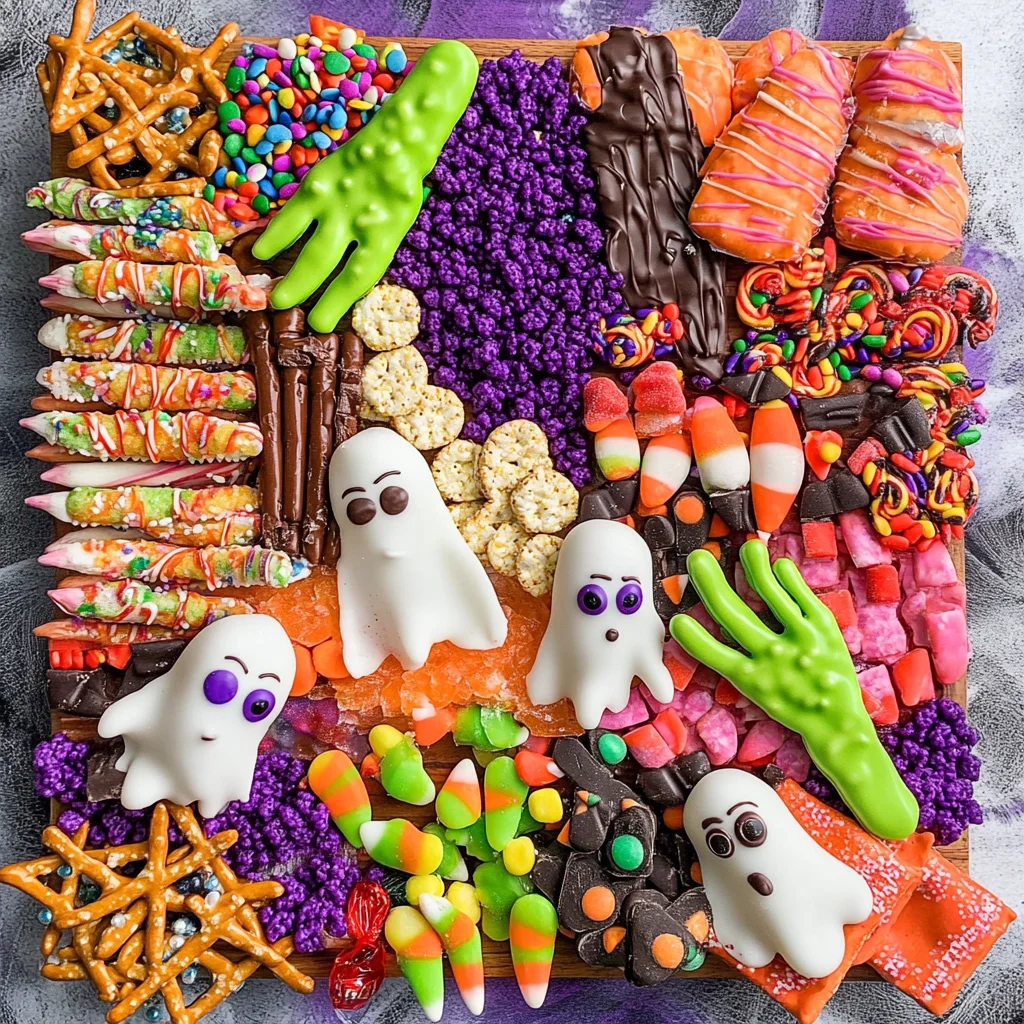
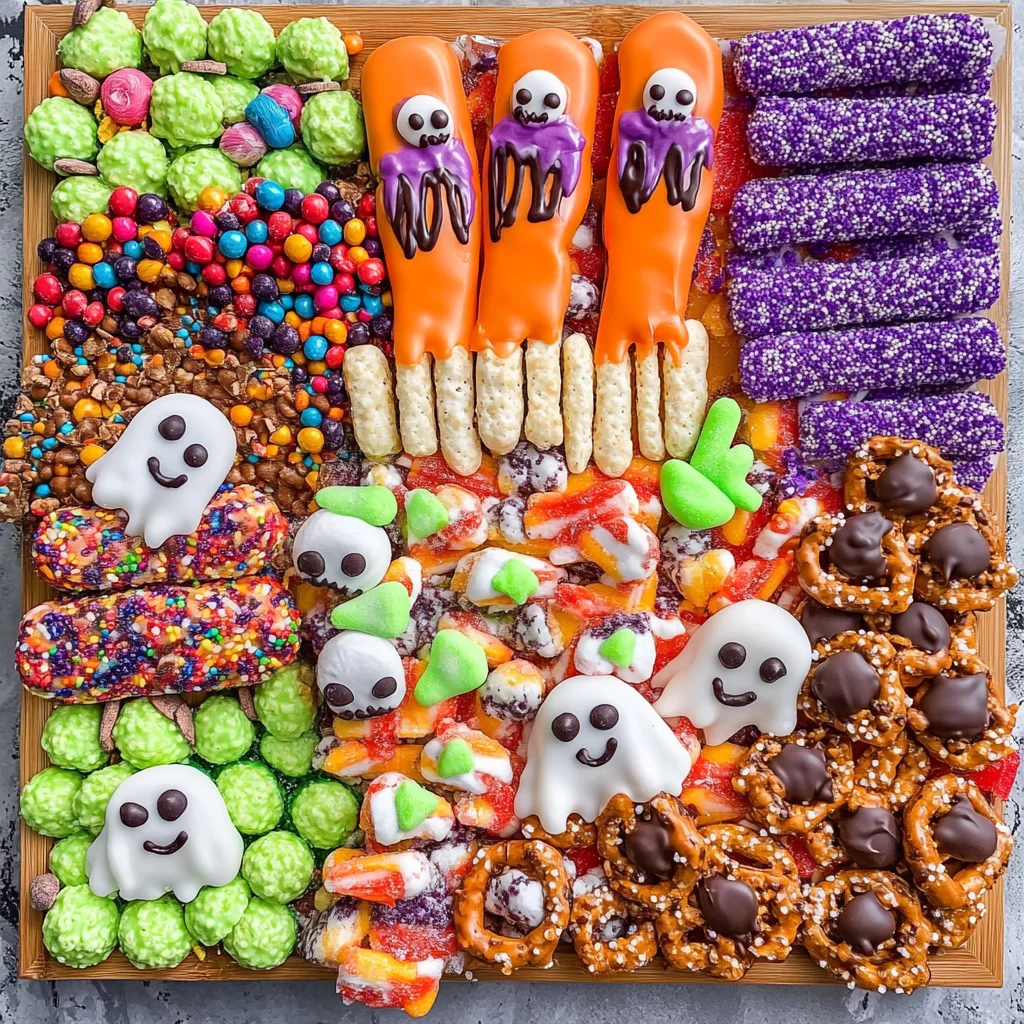
If you’re looking for a fun and festive way to celebrate Halloween, this Halloween Charcuterie Board is just what you need! Imagine gathering around with family and friends, sharing delightful treats that look as good as they taste. This recipe has become a favorite in my home because it’s not only simple to prepare but also a fantastic conversation starter. Whether you’re hosting a spooktacular party or enjoying a cozy movie night, this board will add that extra touch of magic to your celebration.
The best part? You can customize it based on what you love, making it perfect for any occasion. With plenty of candy, chocolate-dipped “creatures,” and a playful skeleton centerpiece, this Halloween Charcuterie Board is sure to be a hit!
Why You’ll Love This Recipe
- Super easy to make: This recipe comes together quickly, so you can spend less time in the kitchen and more time celebrating!
- Fun for the whole family: Kids love helping out with the decorating, making it a great bonding experience.
- Perfect for sharing: With 32 servings, there’s enough for everyone! It’s ideal for parties or gatherings.
- Endless creativity: Feel free to get creative with your favorite candies and treats; there are no strict rules here!
- Deliciously spooky: The combination of flavors and textures will keep everyone coming back for more.
Ingredients You’ll Need
Gathering the ingredients for this Halloween Charcuterie Board is part of the fun! These simple and wholesome items are easy to find and perfect for creating those delightful treats.
For the Monster Treats:
- 8 rice krispie treats
- 5 ounces white chocolate melting wafers
- purple food dye
- candy eyes
- purple sprinkles
For the Witch Fingers:
- 8 pretzel rods
- 10 ounces white chocolate melting wafers
- green food dye
- sliced almonds
For the Ghosts:
- 8 Nutter Butter cookies
- 5 ounces white chocolate melting wafers
- mini chocolate chips
For the Bats:
- 8 Mini Reese’s Cups
- 8 Oreo Thins
- candy eyes
And More Candy:
- 18 ounces Smarties
- 16 ounces red licorice
- 15 ounces Assorted Hershey’s Candy
- 28 ounces sour pectin-based gummy candies
- 40 ounces candy corn
Variations
One of the best things about this Halloween Charcuterie Board is its flexibility! You can easily switch up ingredients or add your personal twist. Here are some fun ideas:
- Add seasonal fruits: Fresh apples or grapes can provide a refreshing contrast to all that sweetness.
- Use different chocolates: Swap in dark or milk chocolate melting wafers for a different flavor profile.
- Change up the candies: Use gummy worms or spooky marshmallows instead of traditional candies for added fun.
- Include savory elements: Add some cheese or crackers for those who might prefer something less sweet!
How to Make Halloween Charcuterie Board
Step 1: Make the Monster Treats
Start by melting your white chocolate melting wafers according to package instructions. Once melted, mix in a few drops of purple food dye until you get your desired color. Dip one side of each rice krispie treat into the chocolate, then decorate with candy eyes and purple sprinkles on top to resemble hair. Set them on a pan lined with parchment paper and let them cool until the chocolate sets.
Step 2: Create Witch Fingers
Melt another batch of white chocolate wafers and mix in green food dye. Pour this melted mixture into a tall cup. Dip each pretzel rod into the green chocolate. Top each rod with a sliced almond at one end to mimic witchy fingernails. Place them on parchment paper to allow them to set.
Step 3: Make Adorable Ghosts
Melt more white chocolate wafers again and dip one side of each Nutter Butter cookie into the melted chocolate. Add two mini chocolate chips as eyes and one chip as a mouth. This gives each ghost character! Let them set on parchment paper.
Step 4: Assemble Bats
Unwrap your Mini Reese’s Cups but keep the inner lining intact. Open each Oreo cookie and scrape out the filling (don’t toss it!). Break each Oreo half into wings, then use some of that filling as glue to attach these wings onto each Reese’s Cup. Add candy eyes using more filling where needed.
Step 5: Assemble Your Board
Place your skeleton diagonally across your serving board as an eye-catching centerpiece. Fill its rib cage with colorful candy! Arrange your larger decorated treats around it, then fill any open spaces with assorted candies like Smarties, red licorice, and candy corn.
Now step back and admire your spooky creation—the perfect Halloween Charcuterie Board ready to impress all your guests!
Pro Tips for Making Halloween Charcuterie Board
Creating the perfect Halloween charcuterie board can be a fun and festive activity! Here are some tips to elevate your spooky spread.
- Plan Your Layout: Start with a clear layout in mind. Visualizing where your larger treats and candy will go helps to create an appealing arrangement that draws the eye and maximizes space.
- Mix Textures: Incorporate a variety of textures—crunchy pretzels, chewy licorice, and creamy chocolate treats. This not only adds visual interest but also makes for a delightful snacking experience.
- Use Seasonal Colors: Stick to a Halloween color palette by using purple, green, orange, and black candies. This creates a cohesive look that enhances the festive atmosphere!
- Make It Interactive: Encourage guests to build their own “monster” treats from the board. Providing small cups or bowls for assembly can make it more engaging, especially for kids.
- Don’t Forget About Height: Layer your treats to create dimension on the board. Use small stands or even upside-down cups for height variation—this makes the board more visually appealing!
How to Serve Halloween Charcuterie Board
Presenting your Halloween charcuterie board is just as important as preparing it! Here are some ideas to showcase your spooky masterpiece.
Garnishes
- Fresh Herbs: Sprigs of mint or rosemary add a pop of green and an aromatic touch that contrasts beautifully with sweet elements.
- Chocolate Drizzle: A light drizzle of melted chocolate over certain candies can add elegance and enhance flavors without overpowering them.
Side Dishes
- Spooky Popcorn: Air-popped popcorn drizzled with melted white chocolate and sprinkled with colorful Halloween-themed sprinkles makes for a light yet festive snack.
- Veggie Platter: A mix of crunchy vegetables like cucumbers, carrots, and bell peppers served with hummus offers a refreshing contrast to the sweetness of the charcuterie board.
- Fruit Skewers: Assemble skewers with seasonal fruits like grapes, oranges, and strawberries for a healthy option that’s easy to grab.
- Cheese Plate: Include some non-dairy cheese options. Pair them with crackers for a savory bite that complements all the sweetness on the board.
Now you’re all set to impress your guests with this delightful Halloween charcuterie board! Enjoy crafting this creative treat while celebrating all things spooky!
Make Ahead and Storage
This Halloween Charcuterie Board not only makes for a delightful centerpiece but is also perfect for meal prep. You can assemble various components ahead of time, making it easy to serve at your spooky gatherings.
Storing Leftovers
- Store any leftover candy and treats in an airtight container at room temperature.
- Keep the assembled charcuterie board covered with plastic wrap if you have leftovers.
- Consume within 3-5 days for the best taste and texture.
Freezing
- Freezing is not recommended for this charcuterie board due to the chocolate coatings and candy textures.
- If you have leftover chocolate-dipped treats, freeze them individually on a baking sheet before transferring them to an airtight container.
Reheating
- There’s no need to reheat the board; simply serve it at room temperature.
- If you’ve made any chocolate-dipped treats, allow them to come back to room temperature before serving if they were stored in the fridge.
FAQs
If you’re looking for more information about this festive treat, here are some common questions!
Can I make a Halloween Charcuterie Board with different candies?
Absolutely! Feel free to mix in your favorite candies and snacks. Just keep in mind that the goal is to maintain a fun Halloween theme!
How long does it take to prepare the Halloween Charcuterie Board?
Preparation takes about 120 minutes, which allows plenty of time for creating those delicious monster treats and arranging everything beautifully.
What can I substitute for ingredients in the Halloween Charcuterie Board?
You can easily substitute different types of chocolates or candies based on availability or personal preference. For example, use dark chocolate instead of white or alternative candies that fit your taste!
Is this Halloween Charcuterie Board kid-friendly?
Definitely! The fun shapes and colorful candies make it appealing for kids, plus they can help out with assembling their favorite parts!
Final Thoughts
Creating a Halloween Charcuterie Board is not just about indulging in sweet treats; it’s about crafting a memorable experience filled with laughter and creativity. I hope you enjoy putting together this playful spread as much as I do! Whether it’s for a party or a cozy movie night, may your board be brimming with delight. Have fun making it, and don’t forget to share your creations!
Halloween Charcuterie Board
Create a memorable Halloween celebration with this festive Halloween Charcuterie Board, brimming with spooky treats and colorful candies. Perfect for gatherings, this creative spread encourages everyone to indulge in deliciously fun snacks that are as delightful to look at as they are to taste. Built around playful monster treats, witch fingers, and adorable ghosts, there’s something for everyone to enjoy. With the added charm of a skeleton centerpiece filled with candy, this charcuterie board is sure to be a hit at your party! Customize it to suit your tastes and let your imagination run wild while assembling a ghoulishly good time.
- Prep Time: 60 minutes
- Cook Time: 30 minutes
- Total Time: 1 hour 30 minutes
- Yield: 32 servings 1x
- Category: Dessert
- Method: Baking
- Cuisine: American
Ingredients
- 8 rice krispie treats
- 5 ounces white chocolate melting wafers
- Purple food dye
- Candy eyes
- Sliced almonds
- 8 Nutter Butter cookies
- Mini chocolate chips
- 8 pretzel rods
- Assorted candies (Smarties, red licorice, candy corn)
Instructions
- For the Monster Treats: Melt white chocolate wafers and mix in purple food dye. Dip rice krispie treats into the chocolate, decorate with candy eyes and sprinkles, then cool on parchment paper.
- For Witch Fingers: Melt white chocolate with green food dye. Dip pretzel rods and top with sliced almonds for nails; set on parchment paper.
- For Ghosts: Dip Nutter Butter cookies in melted white chocolate; add mini chocolate chips for eyes and mouth.
- Assemble your board by placing decorated treats around a skeleton centerpiece filled with assorted candies.
Nutrition
- Serving Size: 1 piece (30g)
- Calories: 120
- Sugar: 10g
- Sodium: 50mg
- Fat: 6g
- Saturated Fat: 3g
- Unsaturated Fat: 2g
- Trans Fat: 0g
- Carbohydrates: 15g
- Fiber: 0g
- Protein: 1g
- Cholesterol: 5mg

Leave a Comment