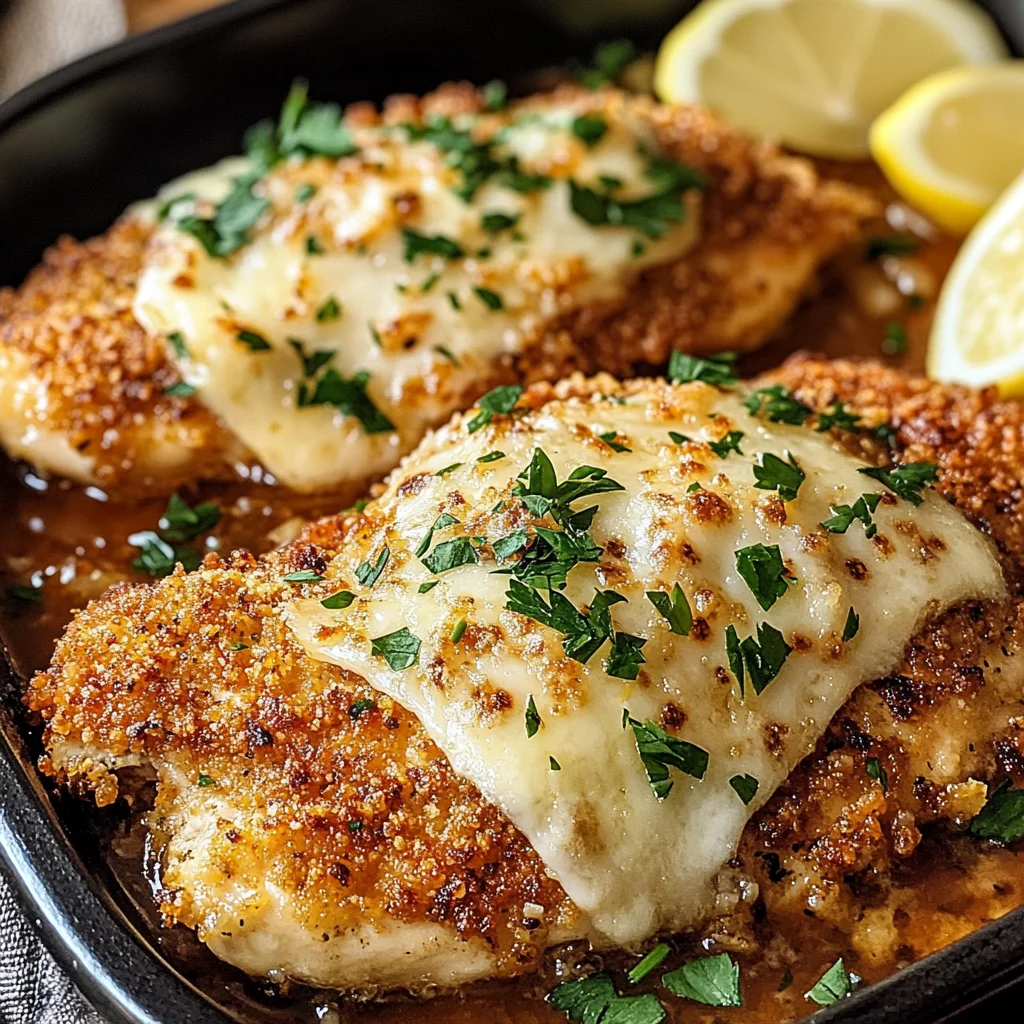
If you’re looking for a dish that’s as comforting as it is delicious, let me introduce you to my beloved Chicken Romano. This recipe has been a staple in my home for years, and it’s perfect for everything from busy weeknight dinners to family gatherings. The crispy, cheesy coating paired with tender chicken creates a meal that brings everyone together around the table. Plus, it’s simple enough that even novice cooks can whip it up with ease!
What makes Chicken Romano truly special is its flavor and versatility. Whether you’re serving it with a side of pasta or a fresh salad, this dish never fails to impress. Trust me, once you try it, you’ll want to keep it in your regular rotation!
Why You’ll Love This Recipe
- Quick and easy: With just 15 minutes of prep time, you can have a delicious meal on the table in no time!
- Family-friendly: Kids and adults alike will enjoy the cheesy, crunchy goodness of Chicken Romano.
- Make-ahead convenience: You can prepare the chicken in advance and fry it up right before serving for an effortless dinner.
- Versatile flavors: Serve it with lemon wedges for a zesty kick or over pasta for a comforting meal.
Ingredients You’ll Need
To make this delightful Chicken Romano, you’ll need some simple and wholesome ingredients that are likely already in your kitchen. Let’s gather what we need!
For the Chicken
- 4 boneless, skinless chicken breasts
- 1 cup all-purpose flour
- 2 large eggs
- 1/4 cup milk
For Coating
- 1 cup grated Romano cheese
- 1 cup Italian-style breadcrumbs
- 1/2 teaspoon salt
- 1/2 teaspoon black pepper
- 1/2 teaspoon garlic powder
- 1/2 teaspoon paprika
For Frying
- 1/4 cup olive oil (for frying)
- 2 tablespoons unsalted butter
For Garnish
- Fresh parsley, chopped (for garnish)
- Lemon wedges (for serving)
Variations
One of the best things about Chicken Romano is how flexible it is! You can easily adapt the recipe to suit your taste or use what you have on hand.
- Swap the cheese: If you’re not a fan of Romano cheese, try Parmesan or even mozzarella for a different flavor.
- Add some spice: Sprinkle in some red pepper flakes to give your coating an extra kick!
- Go vegetarian: Substitute the chicken with eggplant slices for a delicious vegetarian version.
- Try different herbs: Experiment by adding fresh herbs like basil or oregano to enhance the flavor profile.
How to Make Chicken Romano
Step 1: Prepare the Chicken
Start by placing each chicken breast between two sheets of plastic wrap or parchment paper. Using a meat mallet or rolling pin, gently pound them until they are uniform in thickness—about half an inch thick. This step is important because it ensures even cooking throughout.
Step 2: Set Up Your Breading Station
In three separate shallow dishes, set up your breading station: one for flour mixed with salt and pepper, another for whisked eggs combined with milk, and the last one for the mixture of breadcrumbs, garlic powder, paprika, and grated Romano cheese. Having everything ready makes breading quick and easy!
Step 3: Bread the Chicken
Dredge each chicken breast first in the flour mixture, shaking off any excess. Next, dip it into the egg mixture before finally coating it generously with the breadcrumb-cheese mix. Press down lightly to ensure it sticks well—this will give you that satisfying crunch when cooked!
Step 4: Frying Time!
In a large skillet over medium heat, add olive oil and unsalted butter until hot but not smoking. Carefully place your breaded chicken breasts into the skillet without overcrowding them. Fry each side until golden brown—about 4-5 minutes per side. This step is crucial because frying at just the right temperature helps achieve that crispy exterior while keeping the inside juicy.
Step 5: Serve It Up!
Once cooked through (you can check using a meat thermometer—it should read 165°F), transfer your Chicken Romano onto plates or a platter. Garnish with freshly chopped parsley and serve with lemon wedges on the side! The bright acidity of lemon complements this dish beautifully.
And there you have it—your very own Chicken Romano ready to be enjoyed! I can’t wait for you to try this recipe; I’m sure it’ll become as cherished in your home as it is in mine!
Pro Tips for Making Chicken Romano
Making Chicken Romano is a breeze with just a few simple tips to elevate your dish to perfection!
- Use fresh chicken breasts: Fresh chicken not only tastes better but also cooks more evenly, ensuring a juicy and tender result.
- Pound the chicken: Gently pound the chicken breasts to an even thickness. This helps them cook uniformly and prevents drying out.
- Let the coating set: After breading your chicken, let it sit for about 10 minutes before frying. This allows the coating to adhere better during cooking.
- Heat the oil properly: Make sure your olive oil is hot enough before adding the chicken. A good test is to drop a small piece of bread into the oil; if it sizzles, it’s ready!
- Rest before serving: Allow the cooked chicken to rest for a few minutes after frying. This helps retain moisture and enhances flavor.
How to Serve Chicken Romano
Presentation can make all the difference! Here are some creative ways to serve your Chicken Romano that will impress family and friends alike.
Garnishes
- Fresh parsley: A sprinkle of chopped parsley not only adds color but also brings a fresh flavor that complements the richness of the cheese.
- Lemon wedges: Serving lemon wedges on the side allows guests to add a zesty kick that brightens up each bite.
Side Dishes
- Garlic mashed potatoes: Creamy and flavorful, these mashed potatoes are perfect for soaking up any leftover sauce from your Chicken Romano.
- Steamed broccoli: Vibrant green broccoli adds a healthy touch and a nice crunch, balancing out the meal beautifully.
- Caesar salad: A classic Caesar salad offers crisp romaine lettuce, croutons, and a creamy dressing that pairs wonderfully with your savory chicken.
- Pasta primavera: Colorful mixed vegetables tossed with pasta provide a light and satisfying complement to the rich flavors of Chicken Romano.
With these tips and serving suggestions, your Chicken Romano will shine at any dinner table! Enjoy every delicious bite!

Make Ahead and Storage
This Chicken Romano recipe is a fantastic choice for meal prep! It holds up well in the fridge and can be easily reheated, making it perfect for busy weeknights or lunch on the go.
Storing Leftovers
- Allow the Chicken Romano to cool completely before storing.
- Place the chicken in an airtight container.
- Refrigerate leftovers for up to 3 days.
Freezing
- To freeze, wrap each piece of chicken tightly in plastic wrap and then place in a freezer-safe bag or container.
- Label the bag with the date and freeze for up to 3 months.
- For best results, thaw overnight in the refrigerator before reheating.
Reheating
- Preheat your oven to 350°F (175°C).
- Place the chicken on a baking sheet and cover with foil to prevent drying out.
- Heat for about 15-20 minutes or until warmed through. Alternatively, you can reheat in a skillet over medium heat until hot.
FAQs
Here are some common questions you might have about making Chicken Romano.
Can I use different cheese for Chicken Romano?
Absolutely! While Romano cheese adds a wonderful flavor, you can substitute it with Parmesan or Pecorino if desired.
How do I make Chicken Romano ahead of time?
You can prepare the chicken breasts by breading them and storing them in the fridge. Simply fry them fresh when you’re ready to serve!
Is Chicken Romano healthy?
Yes! This recipe is packed with protein and made with wholesome ingredients. It’s a nutritious option for dinner without sacrificing flavor.
What sides pair well with Chicken Romano?
Chicken Romano pairs beautifully with a fresh salad, steamed vegetables, or even pasta tossed in olive oil and garlic.
Can I make Chicken Romano without breadcrumbs?
Yes! You can use crushed nuts or ground oats as a gluten-free alternative to breadcrumbs for a unique twist on this classic dish.
Final Thoughts
I hope you’re excited to try this Chicken Romano recipe! It’s not just delicious; it’s also versatile enough to fit into your weekly meal plans. Whether you’re cooking for family or friends, this dish is sure to impress. Enjoy every bite, and don’t hesitate to explore your own variations. Happy cooking!
Chicken Romano
Indulge in the comforting flavors of Chicken Romano, a dish that combines tender chicken breasts with a crispy, cheesy coating that’s sure to please everyone at the dinner table. This easy-to-follow recipe is perfect for weeknight meals or family gatherings, allowing even novice cooks to create a memorable culinary experience. With its delightful crunch and savory taste, Chicken Romano pairs beautifully with pasta or salad, making it a versatile addition to your meal rotation. Plus, it’s quick to prepare and can be made ahead of time for extra convenience. Once you serve this dish, it’s bound to become a beloved favorite in your home.
- Prep Time: 15 minutes
- Cook Time: 15 minutes
- Total Time: 30 minutes
- Yield: Serves 4
- Category: Main
- Method: Frying
- Cuisine: Italian
Ingredients
- 4 boneless, skinless chicken breasts
- 1 cup all-purpose flour
- 2 large eggs
- 1/4 cup milk
- 1 cup grated Romano cheese
- 1 cup Italian-style breadcrumbs
- Olive oil (for frying)
- Fresh parsley (for garnish)
- Lemon wedges (for serving)
Instructions
- Pound chicken breasts between plastic wrap until uniform in thickness (about half an inch).
- Set up three shallow dishes: one with flour mixed with salt and pepper, one with whisked eggs and milk, and the last with breadcrumbs, garlic powder, paprika, and grated cheese.
- Dredge each chicken breast in flour, dip into egg mixture, then coat with breadcrumb mixture.
- Heat olive oil and butter in a skillet over medium heat. Fry chicken for 4-5 minutes on each side until golden brown and cooked through (internal temperature should reach 165°F).
- Serve garnished with fresh parsley and lemon wedges.
Nutrition
- Serving Size: 1 serving
- Calories: 350
- Sugar: 2g
- Sodium: 500mg
- Fat: 20g
- Saturated Fat: 7g
- Unsaturated Fat: 12g
- Trans Fat: 0g
- Carbohydrates: 18g
- Fiber: 1g
- Protein: 25g
- Cholesterol: 120mg


Leave a Comment